Большой мануал для начинающего солдата
Здравствуйте, сегодня я хотел рассказать все тайны и секреты тф`а, касающиеся класса солдат.
Часть первая: Основы, и немного понтов.
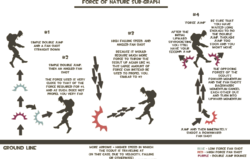
А теперь, поговорим о чём-то более, конкретном. Первое что должен уметь солдат (кроме, как хорошо стрелять), это рокет джампы (далее именующиеся как RJ). RJ бывают трёх типов.
Разницу в высоте рокетджапов можно видеть на картинке ниже.
Также у каждого вида джампов есть несколько подвидов.
Подвид второй: прыжок без опоры в длину, выполняется при движении спиной вперёд, выстрел производится перед собой, таким образом, чтобы придать ускорение параллельно земле.
Подвид третий: прыжок в длину с опорой, самый дальний прыжок. Можно его выполнить только от стены, либо от другого объекта типа покрышек. В момент выстрела вы должны двигаться вдоль объекта, когда вы будете находиться в упор к стене, нужно сделать DJ, после чего вас сильно оттолкнёт от объекта и вы полетите практически параллельно земле.
Для тренировки навыков RJ есть много карт, они часто имеют тег jump_***, я представляю вашему вниманию несколько карт разного уровня сложности.
Для использования таких карт, нужно либо найти сервер с этой картой, либо создать его на своём компьютере. Для создания сервера на своём компьютере нужно: положить карту (файл имеющий расширение *.bsp) в директорию C:\Program Files\Steam\SteamApps\»имя вашего акка»\team fortress 2\tf\maps, запустить игру, нажать кнопку «создать сервер», выбрать в выпадающем списке ту карту которую вы хотите поиграть. Если вы хотите, чтобы к вам могли присоединиться друзья, вам нужно в консоль ввести следующие команды: sv_lan 0, changelevel tr_airshot_v0 (или имя любой другой карты на которой вы собрались играть).
rj_rocketeer карта для начинающих солдов, уровень сложности low+
rj_rocketeer_advanced карта для крутых парней, данная мапа имеет уровень сложности high-
Вот видео по прохождению этой карты:
jump_skip уровень сложности mid-
В этой части я затрону такие животрепещущие проблемы, связанные с кривыми руками.
Если у вас нету опыта игр в другие киберспортивные дисциплины, а, выражаясь простым языком, если ты не задрот, а играть лучше хочется, то тебе нужно тренироваться!
Ну а теперь серьёзно, есть много способов тренировать солда. Помимо RJ карт, есть ещё карты с тегом tr_***, эти карты содержат ботов которых нужно убивать. Довольно часто, перед кв я разминаюсь на этих картах. Вот о них-то речь и пойдёт ниже.
tr_airshot_v0 пожалуй, самая известная и популярная карта для тренировок. А что на ней можно тренировать? Аиршоты! Эта карта очень полезна, для новичков, которые хотят делать красивые аиршоты.
tr_flinger_b2 эта карта младший брат аиршотов. На ней вы выберите местность, это либо шпиль бадландса либо последняя точка гравел пита.
tr_midair_v1 созданная для демомена но можно также юзать и для солда. Название карты (мидэир) происходит от разновидности аиршота, который бывает на близком расстоянии.
tr_rocket_shooting2 название говорит само за себя. Карта хорошо подходит, для тренировки стрельбы ракетами на большом и среднем расстоянии.
tr_aim карта для тренировки аима. Одна из лучших карт для тренировок. Имеет регулировку скорости стрейфа у ботов, можно отключать криты без использования консоли.
Это всё здорово, но это только для новичков или для разогрева перед кв. Предположим, вы стреляете отлично но у вас есть одна проблема и эта проблема высокий пинг, я говорю не о пинге 80 я говорю о пинге 250 на европейских серверах. Что делать? Здесь вам может помочь только конфиг.
Часть третья: Конфиги, пинги.
Ну, для начала хочу сказать зачем вообще нужны конфиги, конфиг это файл содержащий ваши собственные настройки, ваши скрипты да что угодно.
Для начала поговорим о том, как всё же делать конфиги, ведь лучший конфиг это конфиг сделанный самим собой и для себя. Конфиги лежат здесь: C:\Program Files\Steam\SteamApps\»имя вашего ака»\team fortress 2\tf\cfg, файлы имеющие расширение *.cfg можно открывать обычным блокнотом.
alias «+m2bind» «+swap1»
alias «-m2bind» «-swap1»
bind «MOUSE2» «+m2bind»
alias +normaatkkreload «+attack»
alias «+m1bind» «+swap2»
alias «-m1bind» «-swap2»
bind «MOUSE1» «+m1bind»
Нажмите «Сохранить как. «, найдите ту папку о которой я говорил чуть выше, и напишите название файла «Lopata.cfg»
Теперь, чтобы запустить скрипт, нужно зайти на любой сервер (или создать свой), выбрать класс солдат, и в консоли написать «exec lopata.cfg». И теперь при нажатии правой кнопки мыши вы будите брать лопату, про повторном нажатии будите ей бить, при нажатии маус1 (левая кнопка мыши) вы будите брать рокет лаунчер, и т.д.
Это пример скриптинга. Теперь поговорим о конфигах, вообще скрипты я не очень увожаю, в связи с тем, что они периодами могут делать пол работы за тебя, а вот конфиги я оч.люблю.
Я уже говорил о высоком пинге, не знаю как у вас, а я играю в 3 лигах и почти все, они играются с людьми не из России, и поэтому кв проходят на европейских серверах. А пинг на сервере моей команды (находящийся в Голандии), не опускается ниже не бывает ниже 200. Но я для себя написал замечательный конфиг от пинга:
Для того чтобы каждый раз загружать конфиг или скрипт которым вы пользуетесь постоянно, можно положить его в файл с именем класса который юзает этот конфиг, либо в файл с названием «autoexec.cfg», он будет загружаться после каждой вашей смерти и при каждом заходе на сервер.
Вы можете менять пинг конфиг по своему усмотрению, этот конфиг настроен на экстримальное сокращение пакетов передаваемых на сервер, для людей живущих ближе к европейской части России, советую поменять значение cl_cmdrate, на 40.
Если захотите увидеть разницу в пиге с кинфигом и без, можно сделать следующее: заходите на евро сервер нажимаете ТАБ и смотрите пинг который у вас на табло. А если вы наберёте в консоль «ping» вы увидите совершенно другую цифру, многие скажут что консоль показывает правду а табло фейковую. Но это большое заблуждение, при активации команды «пинг», клиент связывается с сервером с учётом стандартных настроек и по этому показывает пинг гораздо больше чем на табло.
Часть четвёртая: работа в команде. Или, дружнее парни а то кирпичь до утра не выгрузим.
Основная задача солдата оборона медика, от скаутов и прочей ериси. В команде зачастую оба солда (в тихие минутки) ходят с медиком, а в когда начинается мясо один солд (более опытный, либо тот у кого меньше хп) юзает (с критскригом всё с по другому, его юзает самый опытный и с самым количеством хп), а второй солд уходит с линии огня, пока убер у противников не погаснет, после чего он возвращается, и тут в зависимости от ситуации, либо помогает меду убежать (если убер слили), либо помогает первому солду добить всех.
Солдат это тот, класс на который возлагается больше всего ответственности. Он, ни в коем случае не должен оставлять медика одного, он не должен оставлять последнюю точку пустой, он не должен аркадить, он не должен умирать на центре. Это лишь малая часть того что солду нельзя, ох а сколько он обязан.
Часть пятая и последняя: ну и чего стоим? Айда купаться!
Данный пост содержит в себе личный опыт набранный за 2 года игры в тф2.
Сервера для тренировки рокет джампа тф2


Для начала разберем что это такое.. speedshot
— это очередное использование бага движка от Велв, которое представляет собой получение скорости от ракеты, приземлившейся на землю сразу за персонажем, с задержкой в несколько десятых секунды, при условии, что персонаж приземлился на землю с некоторой скоростью, полученной после прыжка на ракете/липучке.
Здесь нужно лишь поймать тайминг и постараться привыкнуть к нему. Спидшот может быть очень полезен, например, при захвате развед. данных.
bind «MWHEELDOWN» «+jump»
Этот бинд дает возможность прыгать, используя колесо мыши (Mouse3), так банихопить гораздо проще, чем просто на пробел.
Ну а если все уж совсем плохо, то можете воспользоваться этим:
Это самая простая синхронизация, иногда применяется на паблике для быстрого достижения цели если изначальная точка находится на возвышенности.
Волл баг представляет собой зависание на выпирающих юнитах неровной поверхности карты.
Для того чтобы это осуществить, нужно просто прыгнуть на эту самую неровную поверхность и упереться в неё лицом, своевременно во время полета вниз переменно нажимать A и D (Не спамить, а по очередно нажимать), при этом зажимая W.
Скип заключается в получении ускорения толчком от любой поверхности находящейся под персонажем при условии начального ускорения.
Оказывается, мои знания о C-tap’е были абсолютно минимальны, но ни одного русского гайда где бы объясняли как нужно правильно делать C-tap у меня найти не получилось..
Все же есть англоязычные гайды, надеюсь мои знания английского не подведут.
И так, следовательно чтобы научиться C-tap’у, для начала нужно научиться правильно Прыгать, а для того, чтобы научиться правильно Прыгать, нужно научиться правильно Приседать перед прыжком.
Карта jump_ctap_test
Можете её скачать по этой ссылке [gamebanana.com]
(Так же можно потренироваться на Jump_academy_e [gamebanana.com] )
Установка очень простая, нужно лишь перекинуть файл с картой по этому адресу:
C:\Program Files x86\Steam\steamapps\common\Team Fortress 2\tf\maps
Он не очень то и удобен в использовании, зато не придется мучиться целых 30 секунд, чтобы добавить этот alias в cfg:
С самого начала у меня не было особого желания включать этот раздел в гайд, т.к. это мало применимо на паблике, да и это не совсем основы джампа, но раз уж в гайде есть даже C-tap, то и это вряд ли будет лишним, к тому же, оказывается, у многих с этим проблемы.
И так, после того как вы оказались вплотную к стене, нужно немного поднять прицел и повернуть его левее (Или правее, это зависит от того с какой стороны у вас Ракетомет) и остановиться примерно под тем углом, который вы можете видеть в видео.
Дальше нужно постоянно зажимать W и переменно нажимать D в те моменты, когда вы чувствуете, что вас уносит куда-то не туда и вы начинаете терять равновесие, то есть почти постоянно вам придется тапать эту клавишу. Продолжайте держать равновесие и по немногу подниматься вверх.
Вам нужно будет потратить некоторое время на то, чтобы найти правильный угол для первого выстрела, при котором бы вы не падали вниз и при этом не слишком высоко улетали наверх, правда для спуска по 2-м стенам это не так уж и принципиально.
Когда вы удержитесь на стене, вам будет нужно только удерживать W и сделать 1-2 выстрела в стену чуть ниже, для того, чтобы немного приспуститься, затем можно оттолкнуться к другой стене, но удерживайте D в полете для того, чтобы не улететь слишком далеко влево, далее по той же схеме прыгаем обратно и так далее.
Вам нужно научиться тому, куда нужно целиться при спуске и в дальнейшем чувствовать это.
По 2-м стенам довольно просто спускаться, потому что при потере контроля на одной стене, всегда можно опереться на другую.
Здесь тоже придется поискать правильный угол для успешного начала, после того как вы сможете удерживаться на стене не падая, нужно будет совсем немного повернуть прицел правее (Или ниже), чтобы начать снижаться.
Следите за своими ракетами, они действительно помогут вам определить, как быстро вы падаете.
Если вам кажется, что вы снижаетесь слишком быстро, то стоит прекратить спуск и вернуть прицел на исходную для того, чтобы вернуть равновесие, а после снова продолжать..
Старайтесь постоянно смещаться в какую-нибудь сторону, это поможет вам противостоять падению.
Если вы допустите ХОТЬ ОДНУ ошибку, то вы полетите вниз.
Чтобы обойти угол, вам нужен некий импульс.
Держитесь на самом краю стены до тех пор, пока вы не будете считать, что готовы.
Ваша следующая ракета будет считаться угловым пого.
После толчка от этой самой ракеты вы должны удерживать D дольше, чем обычно, так вы получите больший импульс.
Удерживайте D во время стрейфа через угол.
Ну а после обычное пого до места назначения.
Здесь же все проще.
Такая же подготовка, как и для левой стены, но разные действия на преодоление угла:
Вам не нужно использовать D.
Ваши ракеты выходят с правой стороны, поэтому весь импульс, который вам нужен, исходит из этого.
( Спасибо за небольшую помощь craygore, без него этого раздела не было бы )
Пока что это все, в ближайшее время возможно напишу что-нибудь о сюрфе и рампах.
Jumping
In addition to this basic innate jumping ability of limited height, most classes have means of technical jumping that can exploit weapons or other effects to reach much greater heights.
Contents
Associated weapons
Basic maneuvers
Crouch-jumping
At any point during a jump, the player may crouch by pressing the pre-assigned button. This will cause the classes to bring their legs up in world view and move an additional Hammer unit up, as well as reduce their height by 27 Hammer units from the bottom of their hitbox. This allows them to reach higher surfaces or shrink their hitboxes to dodge enemy fire. By default, a player may only crouch and uncrouch twice while in the air to prevent several exploits.
Crouch-jumping is also used to boost the effect of explosive knock back. By design, any jump involving an explosive will go farther with a crouch-jump than a regular jump.
Air strafing
Air strafing allows players to curve in mid-air to change their trajectory. While airborne, it can be performed by simultaneously strafing and turning smoothly in the same direction. Attempting to move forward with the movement keys (such as holding W) during the maneuver will prevent the player from strafing, while attempting to move backward will also result in a decrease of speed.
Scout jumps
The Scout is the only class with the innate ability to double jump. This can be augmented with the Force-A-Nature, Boston Basher, Winger, or Atomizer, thus creating a wide variety of jumping variations.
Double Jump
By pressing the jump key a second time while in midair, the Scout can perform a second jump in any direction. The extra height and distance this ability grants can be used to access areas which other classes cannot. This can be useful for avoiding enemy fire and ambushing incoming enemies. A careless double jump, however, has an easily predictable trajectory, allowing competent players to make a kill.
It is possible to execute the second jump at any time while in midair. This can be used to negate fall damage by performing the second jump just before hitting the ground.
Triple Jump
Equipping the Atomizer allows the Scout to perform a triple jump while fully deployed. With this ability, the Scout can jump across larger gaps that would otherwise be inaccessible through double jumping. Scouts with this ability are distinct from other Scouts, as a second or third jump will emit a purple cloud beneath their feet.
Force Jump
With the Force-A-Nature equipped, the Scout can use the recoil from a shot while in mid-air to propel himself even higher for an effective triple jump. The third «jump» produced by the Force-A-Nature shot has more horizontal force and is slightly more difficult to aim and predict than a double jump. By jumping forwards and firing the Force-A-Nature downwards, the Scout will propel himself higher than a double jump, but will still have the second jump available in reserve. This acts as a trade-off; horizontal momentum is lost in order to provide greater vertical displacement. As firing the Force-A-Nature while in the air will push the Scout in the opposite direction of the fired shot, he can launch himself in any direction, even downwards.
Bonk! Jump
With the Bonk! Atomic Punch equipped, the Scout is impervious to all damage. Because of this, the Scout can use the recoil from enemy fire, such as from an opposing Sentry Gun or explosives, to propel himself up in the air. The closer to the source of the knockback, the more explosives, or the higher the sentry level is, the longer and faster the jump will be.
Basher Jump
By hurting himself with the Boston Basher or Three-Rune Blade while in midair, the Scout can use the Basher’s self-damaging properties to get to places otherwise inaccessible. Such a maneuver is risky, however, as it only takes four missed swings to bring a non-overhealed Scout with full health to exactly one hitpoint. The overall height gained is also not often a worthwhile trade, being significantly less efficient than using the Atomizer. Extensive use of medkits is therefore required. Much like rocket jumping, crouching while in midair will greatly increase the distance a Basher-jumping Scout can travel. The Boston Basher can be used in conjunction with the Force-A-Nature to achieve maximum height or distance as the Scout in a single jump.
Quad Jump
By combining the Atomizer’s triple jump with the Force-A-Nature’s knock back, a Scout can perform four jumps in quick succession, allowing him to get to hard-to-reach spots and maintain a massive height advantage over the enemies. The safest method to perfom a successful quad jump is to swap weapons to the Force-A-Nature just after having used the Atomizer, the reverse is more difficult due to the Atomizer’s long switch speed, and would leave you with your melee rather than damaging primary out after a jump.
Winger Jump
While having the Winger as the active weapon, the Scout gains 25% additional height in his jumps. This is useful for jumping onto or over things that Scouts normally can’t. This also pairs well with the Force-A-Nature, increasing jumping distance even further, although one would have to swap weapons mid-air to utilize the extra jumps obtained from the Force-A-Nature.
Hype Jump
After filling and activating the Soda Popper’s Hype meter, the player can perform up to five additional air jumps for a brief period. This allows for reaching areas normally inaccessible by Scouts, allowing players to cover much greater distances and reach much higher areas. The weapon is also good for flanking and heckling enemies, as five extra jumps can make the Scout much harder to predict. Note that Hype jumping replaces the Atomizer’s third jump; however, the Winger, while deployed, can be used to increase the height of each jump, further increasing the Scout’s mobility.
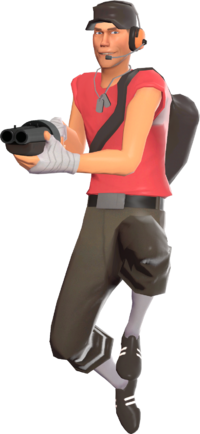
Soldier jumps
Basic rocket jump
A rocket jump is any jump assisted by the explosive knockback of the Soldier’s own rockets. A Soldier can propel himself to great heights and distances, usually at the cost of some health. This technique is often used to reach unusual locations on the map, cover ground quickly, bypass barriers, and surprise foes. To assist with rocket jumps, the Soldier has a 40% damage resistance against any rocket he fires that hurts him while he is in the air. This resistance will take effect even if an enemy was hit with the same rocket used to rocket jump, unlike the Gunboats. Critical hits do not deal extra self-damage or extra knockback to the Soldier, so they will not propel him further. Any rocket jumping Soldier will display burning, smoky boots until he lands, similar to the Demoman.
To execute a rocket jump, simultaneously jump and fire a rocket at the ground below. The angle of the shot and distance from the explosion will determine the velocity and height of the jump. Crouch-jumping before firing the rocket will launch the player significantly farther. The sooner the explosion is made after jumping, the farther and faster the Soldier will fly.
The Market Gardener will deal lethal critical hits (195 damage) when the user is rocket jumping. Landing one of these can sometimes lead to a very impressive and satisfactory kill. Enemy rockets, grenades and stickies will count as an explosive jump if the player is not killed by the explosion. Experienced players can sometimes use this to land critical hits against enemies. Players can also bunnyhop on the ground very precisely before hitting someone to gain a critical hit. The B.A.S.E. Jumper can also be utilized by keeping the player airborne while they attack people with the Market Gardener.
For consistency, self damage caused by rockets will always use the same base damage and blast radius no matter the rocket launcher used, giving consistent launch force for all weapons for a given rocket jump, with self-damage reductions on weapons like the Liberty Launcher applied afterwards and not affecting the force of the jump.
Overload jump
An Overload jump can be achieved by jumping while overloading the Beggar’s Bazooka. This form of rocket jumping is unique in the fact that it can allow the Soldier to perform up to three rocket jumps in mid-air, without worrying about having a surface to propel from, and allows the Soldier to achieve heights often denied to other Soldiers. Practice is required to time when to jump and where to aim while Overloading, but the technique isn’t too difficult to learn. Due to the self-inflicted damage resulting from Overload jumping, especially if the Soldier plans on overloading three times per ‘jump,’ the Gunboats are highly suggested for this technique, as it will decrease the amount of damage from overloads. Knowing where Health Packs are on the map is also a necessity, as the multiple overloads and fall damage will often leave the Soldier at very low health.
Advanced rocket jump
There are multiple variations of the basic rocket jump. Most are regularly used on jump maps, but they can also be used in a normal game to gain great speed or height.
Demoman jumps
Basic sticky jump
A sticky jump is any jump assisted by the explosive knock back of the Demoman’s own stickies. Compared to the Soldier’s rocket jump, the Demoman pays more health, but jumps much higher and farther. This technique is often used to reach unusual locations on the map, cover ground quickly, bypass barriers, and surprise foes. To assist with sticky jumps, stickies deal 25% less self-damage. Critical hits do not deal extra self-damage or extra knockback to the Demoman, so they will not propel him farther. Any sticky jumping Demoman will display burning, smoky boots until he lands, similar to the Soldier.
To execute a successful sticky jump, place a sticky bomb on the ground and wait for it to arm. Jump over the sticky and detonate it. Your distance from the sticky’s wide explosive radius will determine height, velocity, and damage taken to a significant degree. Crouch-jumping will cause the explosion to launch you significantly farther.
Advanced sticky jump
Advanced sticky jumping techniques are similar to a Soldier’s rocket jumping techniques, but the mechanics are somewhat different because of the sticky’s arming period.
Grenade jump
Much like rockets, stickies, and other explosives, a Demoman’s Grenade Launcher can be used to jump. The explosion has power and damage comparable to a rocket jump, but is far more difficult to time and execute. They are rarely used in actual play, but are a niche for Demomen wielding the Chargin’ Targe, Splendid Screen, or Tide Turner, which can also give a boost while jumping and is similar to rampsliding. This allows for Demoknights to perform trimps without a ramp as they jump before charging and strafing (to recieve extra height). This form of jumping may also be preferable if you have stickies already placed and do not wish to detonate them to jump somewhere. Grenades deal 25% less self-damage.
There are three rules of thumb for executing a good grenade jump.
To perfectly time a grenade jump, immediately reload after deploying the grenade and jump after the second audible click plays. A visual clue is to watch the rings around the grenade, which pulses increasingly faster as it nears detonation.
The Iron Bomber is useful for performing grenade jumps, as its projectiles do not move far from where they land. This lets you position yourself over your grenades much more easily.
Caber jump
The Ullapool Caber can be used to jump; by striking the ground or a nearby wall, the Demoman will be launched directly upwards, making it useful to reach some high locations. However, caber jumps are more damaging than sticky jumps or grenade jumps, and while easier, are not as effective. It is also possible to use caber jumps in combination with sticky jumps and grenade jumps; by striking a wall while airborne, the Demoman will gain a significant boost. In addition to this, it is possible to combine a surf (gliding over a ramp at high speeds) with a caber jump by crouching and striking the ground with the caber at the end of the aforementioned ramp. This often means that the Demoman will have more airtime and momentum.
Cannon jump
Similar to the Grenade Launcher, the Loose Cannon can be used to perform explosive jumps without the detonation of sticky bombs, or to retain the use of a charge shield. Cannonballs deal 25% less self-damage.
Rampsliding
Rampsliding, or Trimping, uses the charging ability of the Chargin’ Targe, the Splendid Screen, or the Tide Turner to propel the Demoman off of inclined surfaces.
Pyro jumps
Deflected rocket jump
The Pyro can take advantage of the knockback effect of reflected projectiles to jump. By aiming the compression blast at their own feet, the Pyro can redirect incoming Soldier’s or Sentry Gun’s rockets into a powerful rocket jump. Because the Pyro has no self-damage resistance, this jump generally sends the Pyro farther and higher than what a Soldier could do, however this also means that the Pyro will take considerably more damage than a Soldier would in the same situation. Pyros can also jump with reflected grenades, though the reflecting force exerted by the compression blast in conjunction with the smaller window of time before the detonation make it very tricky to use properly. Sentry Gun rockets can also be used to jump; Sentry rockets will launch the Pyro higher into the air than the Soldier’s rockets, but also inflict more self-damage.
Flare jump
The Pyro can use the explosive flares shot by the Detonator or Scorch Shot to gain additional jump height and distance. It can be used to clear gaps or jump to higher areas that are normally unreachable by the Pyro, which can prove useful for ambushing. The Detonator jump is significantly more powerful than the Scorch Shot jump. While incapable of damaging enemies, the explosion created by the Detonator’s flare colliding with the world will boost the Pyro who shot it, preventing a necessity of timing a difficult manual detonation.
Due to a bug, the Flare Gun can also be used to flare jump when shot close to a wall under a specific angle. [1]
Thermal Thruster jump
The Pyro can use a Thermal Thruster’s charge to launch themself in the direction they’re looking at. When activating the Thermal Thruster, the initial liftoff sends the Pyro up a short distance in the direction they’re aiming. The weapon’s mobility greatly outperforms that of the Detonator and Scorch Shot, but it lacks offensive capability outside of its stomp effect akin to Mantreads. Its slow switch speed makes it more useful for sneaking into higher levels of the map than for making quick escapes or jumping into an attack.
Engineer jumps
Building Step jump
The Building Step jump utilizes the Engineer’s ability to stand on his own buildings in order to reach ledges that are at a medium height. It is executed by simply crouch-jumping on top of a building and using the height gained to crouch-jump up to the target ledge. While Sentry Guns are slightly taller than Dispensers, for this purpose, Dispensers are often more convenient to use due to a lower metal cost; there is almost no practical advantage to step jumping off of a Teleporter. Contrary to some expectations, the building does not have to be fully constructed or upgraded; the height it gives when stood on is constant, regardless of its animation and level.
Examples of potential locations for a Building Step jump include RED’s advanced spawn on Dustbowl’s stage 3 (which allows Engineers to return to spawn easily) and RED’s right side of Gold Rush’s stage 1 (which allows Engineers to reach a common setup location from an unexpected direction).
Note that savvy enemies are capable of using a Dispenser for a jump, just as its Engineer can. Disguised enemy Spies can also use Sentry Guns in this way.
Sentry rocket jump
There are two ways to Sentry Gun rocket jump;
Scripting can automate the hard method, but the technique can be learned manually. While looking at your Sentry Gun, tap the following keys in rapid succession: Crouch-jump and fire rockets simultaneously, switch to your last weapon, and then pack-up the Sentry Gun. If you want to avoid crouch-jumping, you can cut out that step by standing on your Sentry instead.
Using the hard method, you can rapidly relocate and redeploy your Level 3 Sentry in unusual and/or aggressive locations. The Rescue Ranger can also be used in place of this technique, as it allows you to haul buildings from a distance, if you have a line of sight to them. When using the Rescue Ranger, make sure that you will be able to see the sentry from your destination, and ensure you have 100 metal to haul it to you. You can also use the Rescue Ranger’s building pickup ability in the air.
It is recommended that you jump in the direction the rockets were fired, as the launch angle can be hard to determine otherwise.
Sentry bullet jump
Sentry bullet jumps are more difficult than Sentry rocket jumps, but they can be performed with any Sentry and often do less damage to the Engineer. The Gunslinger’s Mini-Sentry is especially useful for bullet jumping. It deals even less damage and fires faster, providing more knockback for the jump.
The technique is deceptively simple. Stand on top of your Sentry Gun, aim in the direction you want to go, crouch-jump, and fire. Your bullets should propel you high into the air. Most bullet jumps fail due to aiming too low or because the angle of the Sentry Gun’s fire isn’t pushing you up fast enough to overcome gravity.
If you have difficulty bullet jumping at angles, a simpler technique is deploy your Sentry beside the location you want to reach, stand on it, and fire almost straight up. Once you are nearly at the height you desire, aim a touch in the direction you wish to go, and the last few bullets will nudge you horizontally at your target.
Energy Orb jump
An Energy Orb jump utilizes the Short Circuit’s self-damage when in close range of a enemy, giving almost the power of a Rocket Jump.
Other jumps
Quick-Fix jump
As a Medic using the Quick-Fix, when the player you are healing does an explosive jump, the Medic is blasted with similar force in the same direction, but takes no damage (although fall damage is still incurred). This only works with Soldiers, Demomen, and Pyros. It does not work with sentry jumps. This is useful to get Medics to the front lines faster, to allow them to reach otherwise inaccessible locations, and to make up for the health loss of explosive jumps.
Enemy-assisted jump
While unlikely, it is possible to use opponents’ attacks to make jumps. For example, Bonk! Atomic Punch Scouts or Dead Ringer Spies can use the knockback of a high-leveled Sentry Gun or a cluster of stickies to fly across a map, while any class could feasibly jump a fair distance using an incoming enemy rocket or grenade. Attempting to make enemy-assisted jumps will often deal high damage and may result in being juggled.
Pumpkin jump
A Pumpkin jump uses Pumpkin bombs to launch the player into the air.
Inability to jump
There are certain states a player can be in that prevent them from jumping;
Jump exploits
These jump exploits allow players to perform unusual and unintended behavior.
Needle boosting
Prior to the December 31, 2007 Patch, Syringe Gun needles pushed friendly players a small amount. With enough Medics using needle boosting, the player could be launched very high on a wave of needles.
Bunny hopping (speed)
Prior to the October 31, 2007 Patch, you could jump repeatedly to preserve forward momentum. Rocket jumping, air strafing, and other techniques could be used to increase the momentum gained from bunny hopping, allowing players to move far faster than intended.
Despite this patch, you still get a small speed boost when air strafing.
Bunny hopping (airborne)
When the player jumps within a very short time span right after landing from an explosive jump, the falling sound will continue to play and the player will still be considered airborne; consequently, the player is still granted effects like guaranteed crits with the Market Gardener. This bug is not yet patched.
Related achievements
 Scout
Scout
 Scout
Scout 


In a single life, kill an enemy while you are on the ground, in the air, and in the water.
Soldier
 Soldier


While rocket jumping kill an enemy with the Equalizer before you land or just after landing.
|
| Wings of Glory Kill an enemy soldier while both you and the target are airborne. |


While rocket jumping, use a rocket to kill a rocket jumping enemy who also kills you with a rocket.
Pyro
 Pyro
Pyro 
Demoman
 Demoman


Heavy
 Heavy
Heavy 
Sniper
 Sniper