Using the Inspector (Использование панели Inspector)
Inspecting Game Objects
Панель Inspector используется для того, чтобы просматривать и редактировать Свойства объектов различными способами.
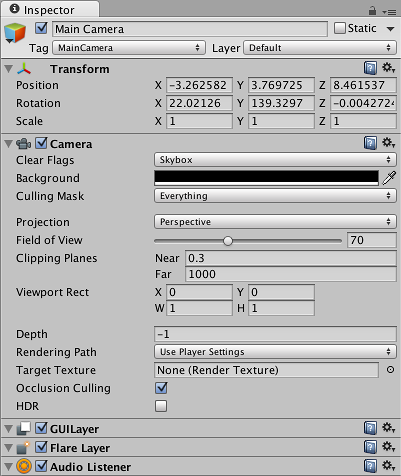
When you select a GameObject in the Hierarchy or Scene View, the Inspector will show the Properties of all Components and Materials on that object and allow you to edit them. The image above shows the inspector with the default 3D camera GameObject selected. In addition to the object’s position, rotation and scale values, all the properties of the camera are available to edit.
Inspecting Script Variables
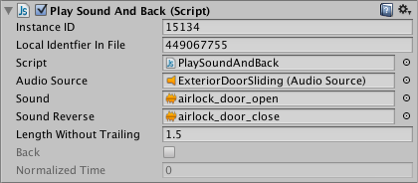
When Game Objects have custom Script components attached, the public variables of that script are also shown in the inspector and can be viewed and edited like the properties of Unity’s built-in components. This allows you to set parameters and default values in your scripts easily without modifying the code.
Inspecting Assets
When an Asset is selected in your Project Window, the Inspector will show you the settings related to how that asset is imported and used at runtime. Each type of asset will have a different arrangement of settings. Below are some examples of the inspector showing the import settings for other asset types:
 Inspector отображает геймобъекта c компонентами Inspector отображает геймобъекта c компонентами Inspector отображает геймобъекта c компонентами
Project Settings
Что такое инспектор в юнити

Любое отображённое в инспекторе свойство можно изменять напрямую. Даже переменные скрипта могут изменяться без изменения самого скрипта. Вы можете использовать изменение переменных в инспекторе для экспериментов в прямом времени и тем самым придумать какие-нибудь элементы для вашей игры. В скрипте, если вы задали public переменную объектного типа (вроде GameObject или Transform), вы можете перетянуть GameObject или префаб в инспектор, чтобы его назначить.

Нажмите на вопросительный знак рядом с именем любого компонента в инспекторе, чтобы открыть страницу справки по этому компоненту.
 Добавление компонентов из меню Component
Вы можете нажать на иконку маленькой шестерни (или правой кнопкой по имени компонента), чтобы открыть контекстное меню для определённого компонента.

Также инспектор покажет любые настройки импорта для выбранного ассета.
 Нажмите Apply, чтобы реимпортировать ваш ассет.
Префабы
Если у вас выбран префаб, то в инспекторе будет доступно несколько дополнительных кнопок. Чтобы получить больше информации о префабах, см. Prefab.
Иконки
Для всех элементов Unity инспектор отображается с отличительной иконкой в верхнем левом углом рядом с именем. Для игрового объекта или префаба, можно установить пользовательскую иконку, чтобы определить объект в сцене. Если вы нажмёте на иконку, то появится меню выбора:-
Большие, продолговатые иконки сверху меню будут отображать имя объекта в окне Scene View на панели соответствующего цвета.
Иконки поменьше, в нижней части меню не будут отображать имени объекта, а просто будут идентифицировать его при помощи небольшого значка выбранной формы и цвета. Кнопка Other снизу меню позволит выбрать любую текстуру из проекта для идентификации объекта.
Метки
![]()
Снизу справа у панели есть кнопка c нарисованным многоточием на ней. После нажатия на эту кнопку, появится меню доступных меток.

Вы можете выбрать один или более элемент из меню меток, чтобы пометить ассет ими (они также появятся на панели Labels). Если вы нажмёте ещё раз на одну из активных меток, то она будет удалено из ассета.

В меню также есть текстовая форма, позволяющая вам указать фильтр поиска по метакм в меню. Если вы введёте имя метки, которой ещё не существует, и нажмёте Return/Enter, то новая метка будет добавлена в список и применена к выбранному ассету. Если вы удалите пользовательские метки из всех ассетов в проекте, то они исчезнут и из списка.
Как только вы примените метки к вашим ассетам, вы сможете использовать их, чтобы улучшить процесс поиска в Project Browser.
Настройки инспектора
Блокировка
Обычно инспектор отображает детали текущего выбранного объекта, но иногда бывает полезным, чтобы в инспекторе отображался один объект, пока вы работаете с другими. Чтобы так сделать, у инспектора есть режим блокировки (Lock), который вы можете активировать при помощи маленькой иконки замка в верхнем правом угле окна инспектора.
Учтите, что у вас может быть открыт больше чем 1 инспектор одновременно (выбрать из меню инспектора Add Tab ), таким образом вы можете иметь и заблокированного инспектора и дополнительного, для работы с выбранным объектом.
 Adding a new tab, docking it under the current inspector tab, and locking it.
Режимы Нормальный/Отладка
Другая опция в меню, это выбор между режимом Normal(нормальный) и Debug(отладка) Обычно, инспектор отображает пользовательский редактор для ассета или компонента, если есть доступный, но иногда удобнее напрямую видеть параметры. Режим отладки отображает только параметры, в отличие от пользовательского редактора, а для скриптов он также отображает и private переменные (хотя их значения не могут быть изменены так, как public переменные).
 Скрипт отображаемый в режиме отладки с затемнёнными private переменными
Как и режим блокировки, режим Нормальный/Отладка применяется индивидуально для каждого инспектора, таким образом у вас может быть открыто 2 инспектора одновременно так, чтобы видеть оба окна.
Plugin Inspector
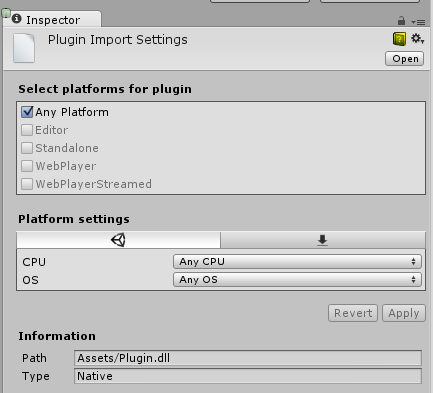
The Plugin Inspector is used to select and manage target platforms for the plugins in your project. Simply select a plugin file to view its Inspector.
 Inspector for a plugin called “CustomConnection”
Under Select platforms for plugin, choose which platforms will use the plugin by checking the appropriate boxes. If you select Any Platform, the plugin will apply to all platforms, including the Unity editor.
Once you have selected the platforms, you can choose additional options such as CPU type and specific OS from the separate Platform Settings section below. This contains a tab for each platform selected by the checkboxes. Most platforms have no settings, or just a few (such as CPU and OS selection).
Certain folders are treated as a single bundle plugin. No additional plugins are detected within such folders. The following extensions identify folders that are treated as bundle plugins:
Default settings
To make transition easier from earlier Unity versions, Unity will try to set default plugins settings, depending on the folder where the plugin is located.
Device-specific settings
Editor settings
For instance, if you select CPU X86, the plugin will be used only in 32 bit Editor, but will not be used in 64 bit Editor.
If you select OS Windows, the plugin will be used only in Windows Editor, but will not be used by the OS X Editor.
The Inspector window
Projects in the Unity Editor are made up of multiple GameObjects that contain scripts, sounds, Meshes, and other graphical elements such as Lights. The Inspector window (sometimes referred to as “the Inspector”) displays detailed information about the currently selected GameObject, including all attached components and their properties, and allows you to modify the functionality of GameObjects in your Scene.
 The Inspector in its default position in Unity
Inspecting GameObjects
Use the Inspector to view and edit the properties and settings of almost everything in the Unity Editor, including physical game items such as GameObjects, Assets, and Materials, as well as in-Editor settings and preferences.
 The Inspector window displaying settings for a typical GameObject and its components
When you select a GameObject in either the Hierarchy or Scene view, the Inspector shows the properties of all components and Materials of that GameObject. Use the Inspector to edit the settings of these components and Materials.
The image above shows the Inspector with the Main Camera GameObject selected. In addition to the GameObject’s Position, Rotation, and Scale values, all the properties of the Main Camera are available to edit.
Inspecting script variables
When GameObjects have custom script components attached, the Inspector displays the public variables of that script. You can edit these variables as settings in the same way you can edit the settings of the Editor’s built-in components. This means that you can set parameters and default values in your scripts easily without modifying the code.
Inspecting Assets
When an Asset is selected in your Project window, the Inspector shows you the settings related to how that Asset is imported and used at run time (when your game is running either in the Editor or your published build).
Each type of Asset has a different selection of settings. The images below demonstrate some examples of the Inspector displaying the import settings for other Asset types:
 The Inspector window displaying the import settings for an Audio file
 The Inspector window displaying the Import Settings for a Texture
Prefabs
If you have a Prefab selected, some additional options are available in the Inspector window.
For more information, see documentation on Prefabs.
Project settings
When you select any of the Project Settings categories (menu: Editor > Project Settings), these settings are displayed in the Inspector window. For more information, see documentation on Project Settings.
Icons and labels
You can assign custom icons to GameObjects and scripts. These display in the Scene view along with built-in icons for GameObjects such as Lights and Cameras.
For more about icons and labels, see Unity documentation on assigning icons.
Re-ordering components
To reorder components in the Inspector window, drag-and-drop their headers from one position to another. When you drag a component header, a blue insertion marker appears. This shows you where the component should go when you drop the header:
 Dragging and dropping components on a GameObject in the Inspector window
You can only reorder components on a GameObject. You can’t move components between different GameObjects.
You can also drag and drop script Assets directly into the position you want them to appear.
When you select multiple GameObjects, the Inspector displays all of the components that the selected GameObjects have in common. To reorder all of these common components at once, multi-select the GameObjects, then drag-and-drop the components into a new position in the Inspector.
The order you give to components in the Inspector window is the order you need to use when querying components in your user scripts. If you query the components programmatically, you’ll get the order you see in the Inspector.
2018–04–23 Page amended with limited editorial review